Set up a virtual Airwall Gateway in VMware ESX/ESXi
This section contains instructions to install a virtual Airwall Gateway on the ESXi/ESX (VMware) platform.
Prerequisites
- Required licenses
- An Airwall 300v license for each virtual Airwall Gateway you are setting up.
You will also need:
- An existing installation of VMware ESX/ESXi server version 6.5.0 and later
- An Airwall Gateway OVA
- The Conductor you are connecting to configured and available
System Requirements
The following VMware ESX/ESXi server hardware is required:
- Processor
-
- Minimum requirement of a single processor with hyper-threading support, VT-x technology, and 64-bit architecture.
- Optimum configuration is minimum 4 processing cores with hyper-threading support, VT-x technology, 64-bit architecture, and AES-NI enabled in the host's BIOS.
- Virtual image
-
Below are the minimum configuration requirements available for a virtual Conductor or Airwall Gateway image:
Platform Memory Disk Conductor 4GB 120GB* Airwall Gateway 1GB 1GB* * Already included in the default OVA package
Port Group Configuration
By default, a virtual Airwall Gateway OVA image comes with two network interfaces.
- Port 1 functions as the underlay network
- Port 2 functions as the overlay network
The virtual Airwall Gateway is expandable up to 6 ports. You can configure one port for HA heartbeats with the HA role.
Security configuration
VMware port groups have default security settings inherited from their parent virtual switch. The following port group security settings should be changed to Accept:
- Promiscuous Mode
- Allows virtual interface adapters connected to this port group to see all Ethernet frames passed on the virtual switch that are allowed under the VLAN policy for the port group.
- Forged Transmits
- Allows virtual machines to send frames with a MAC Address that is different from the one specified on the virtual interface.
VLAN configuration
- Set VLAN type to VLAN
- Set a VLAN ID unique to this Airwall Gateway overlay device network and protected device
To deploy the virtual image
Please check your VMware documentation for the most recent instructions.
- Download the Airwall x86_64 OVA (ESXi) file from Latest firmware and software.
- Deploy a new OVF template from within ESXi using the downloaded OVA file. For most deployments, you can keep the default settings.
- Give the virtual machine a unique name and select its storage location.
- Map the virtual machine's network interfaces with the correctly assigned port groups for the Airwall Gateway.
- Set Disk provisioning to Thin Provisioned.
- Verify your configuration, check Power on after deployment, and then select Finish to begin the update.
Configure a running Airwall Gateway in VMware ESX/ESXi
Once the Airwall Gateway virtual image is successfully running, you can configure the unit to connect to Conductor. The underlay network interface (port 1) defaults to a DHCP-configured interface.
-
In the vSphere ESXi client, select one of the console links:
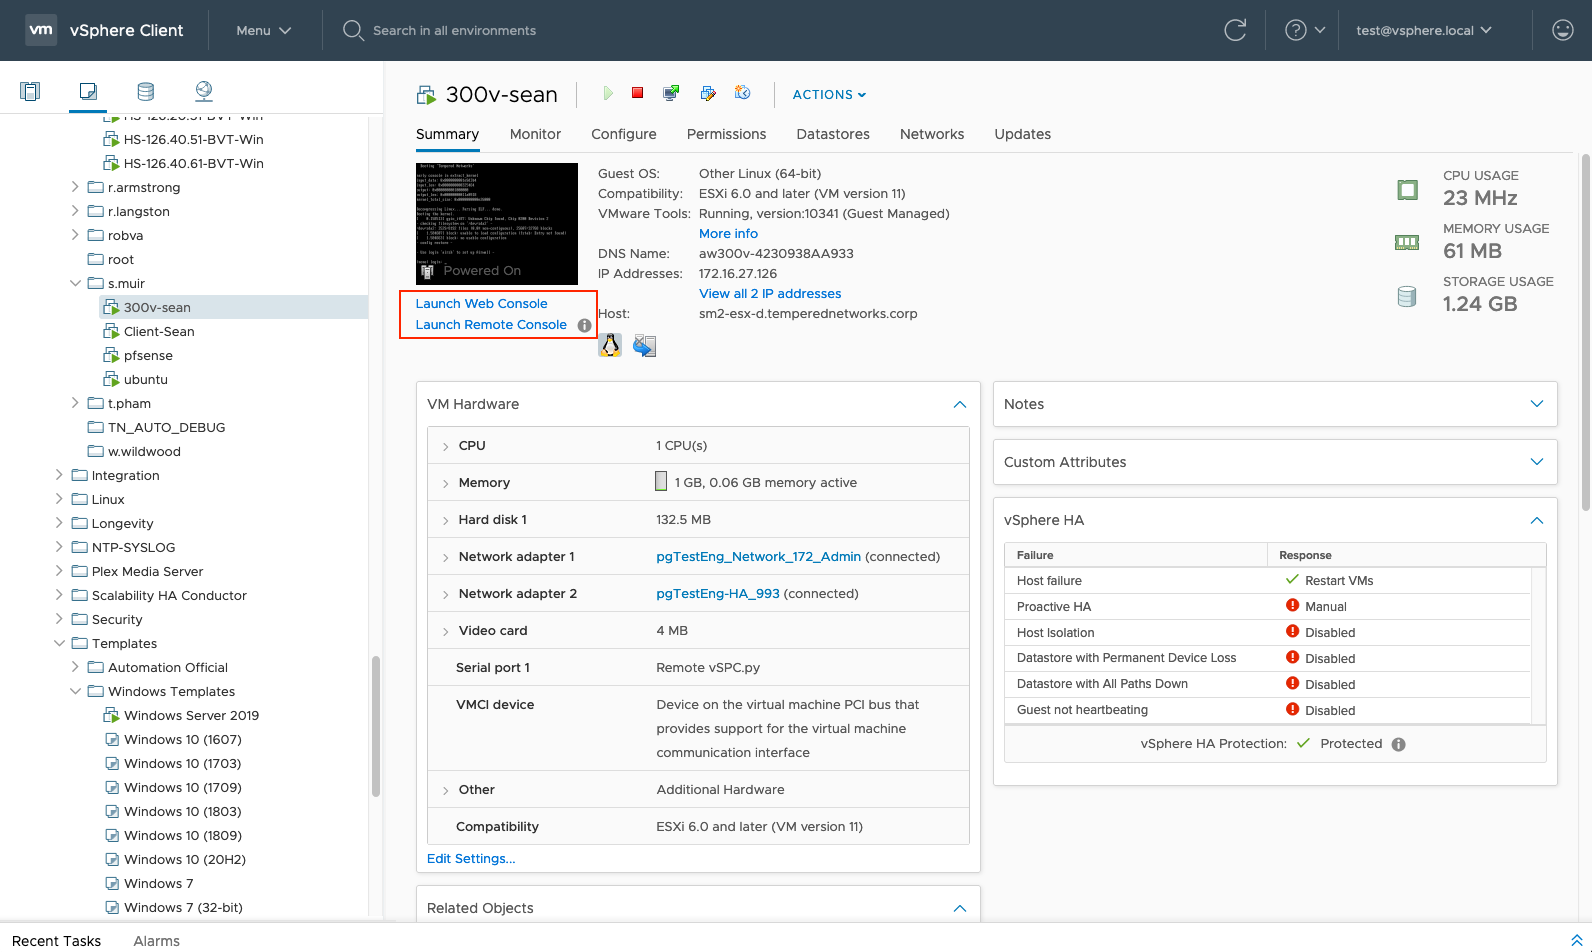
Launch Web Console opens in a new tab in the browser. Launch Remote Console opens in a desktop app that you may need to install.
-
On the Airwall Gateway,
log in to Airshell
with name:
airsh, and no password (2.2.8 and later). -
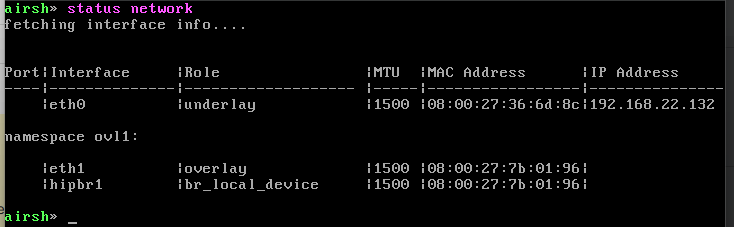
You can either determine the IP address for port 1, or manually set it:
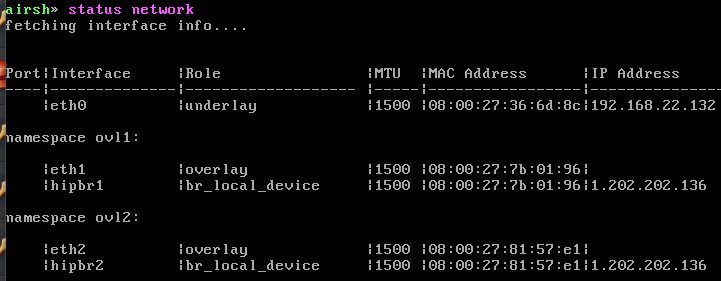
- To determine the IP address assigned to port 1, at the Airshell
prompt, enter status network:
airsh> status network - To manually set the IP address for port 1, from the console
prompt, enter conf network and select 1 to
configure the IP. For more help, see Configure Port Groups with Airshell:
airsh> conf network
- To determine the IP address assigned to port 1, at the Airshell
prompt, enter status network:
-
Configure the Conductor
using
conductor setfollowed by the address and port. For example:airsh> conductor set my-conductor.tempered
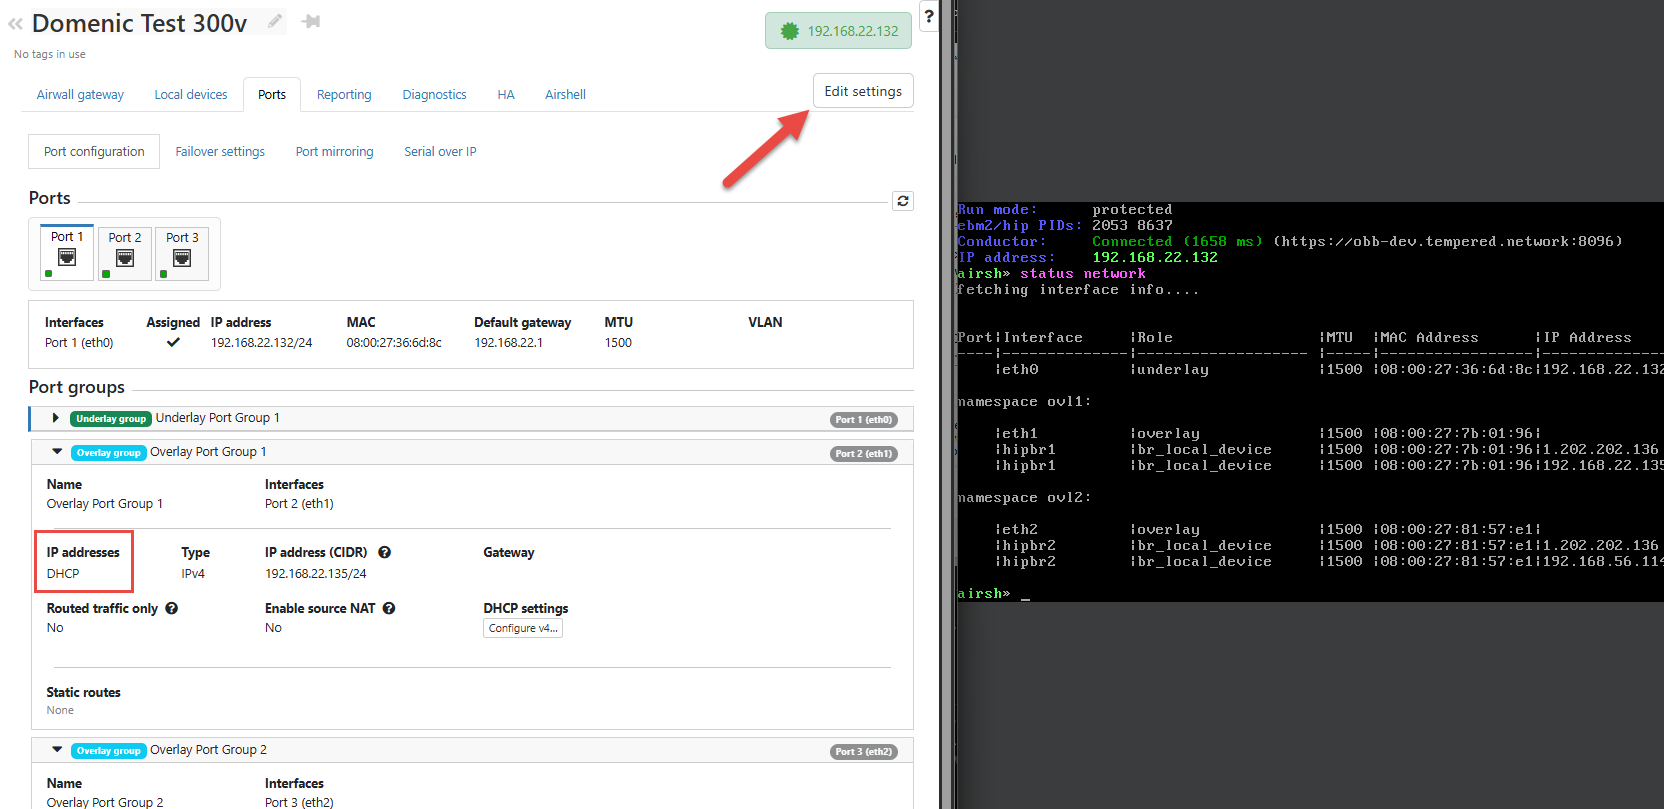
Increasing the Port Count on a 300v Device in VMware or VirtualBox
This section contains instructions about how to increase the number of network ports on your 300v virtual device.
- Download the latest 300v image from: Latest firmware and software
- Follow the virtualization setup instructions: Set up a virtual Airwall Gateway in VMware ESX/ESXi
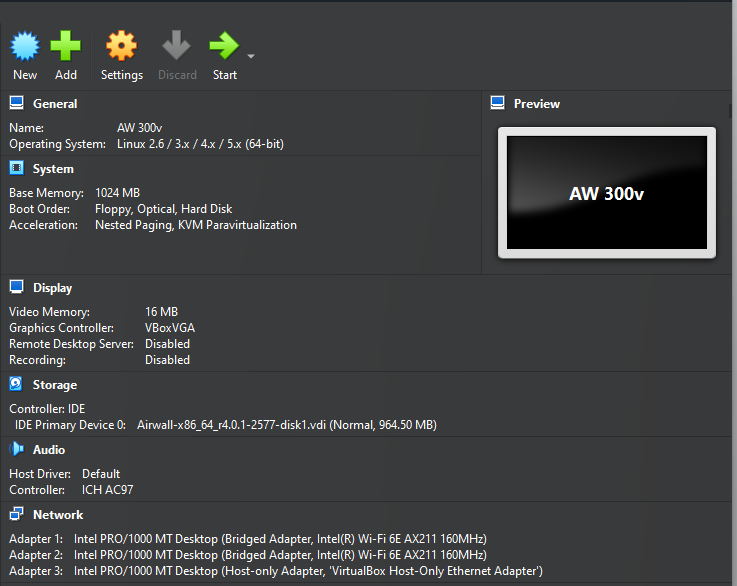
- Import the downloaded 300v image into your virtualization software. Use the default settings: 1GB of RAM and 2 bridged network adapters.
-
Start the virtual machine and complete the initial network configuration.
- Shut down the virtual machine.
-
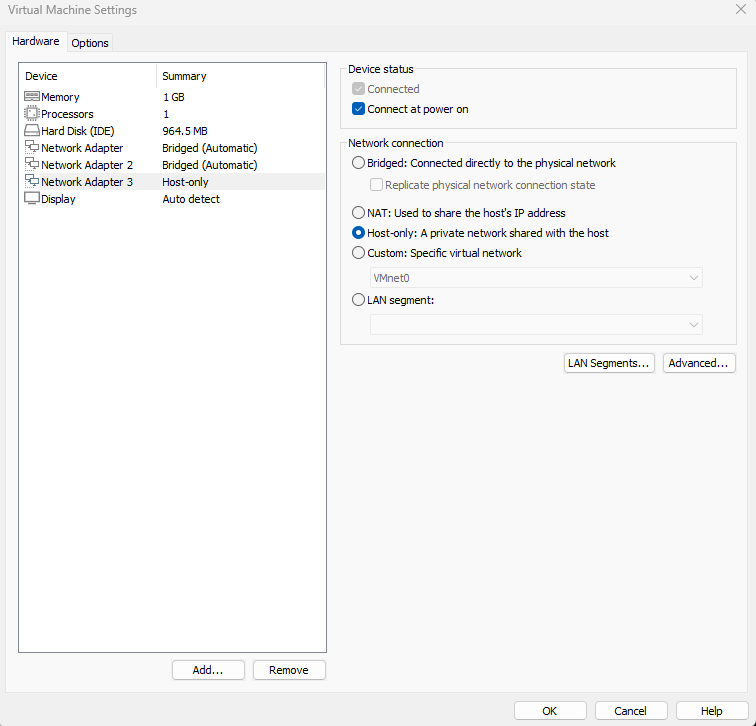
Add a third network adapter in your virtualization software.
- For VMware: Go to the VM’s settings, click Add, select Network
Adapter, and choose the network type (such as Host-only or
Bridged).
- For VirtualBox: Go to the VM’s settings, navigate to Network,
enable Adapter 3, and choose the appropriate network type (For example,
Host-only Adapter).
- For VMware: Go to the VM’s settings, click Add, select Network
Adapter, and choose the network type (such as Host-only or
Bridged).
-
Start the virtual machine again. You should now see three network adapters
present.
-
Open the Airwall shell (airsh) on the 300v device and set your Conductor
address as follows:
airsh> conductor set <your_conductor_url> -
Replace <your_conductor_URL> with the actual Conductor address used in your
environment, for example:
airsh> conductor set example-conductor.network -
Wait for the Onboard Request to be received and approved in the
Conductor.
-
Once approved, the device will be successfully onboarded and connected to the
Conductor with three network adapters.
-
Configure all network adapters to use DHCP so they automatically receive IP
addresses.
-
Start another virtual machine on the same subnet as the newly added adapter
(For example, 192.168.56.1/24).
- Confirm that the second VM receives an IP address (For example, 192.168.56.107).
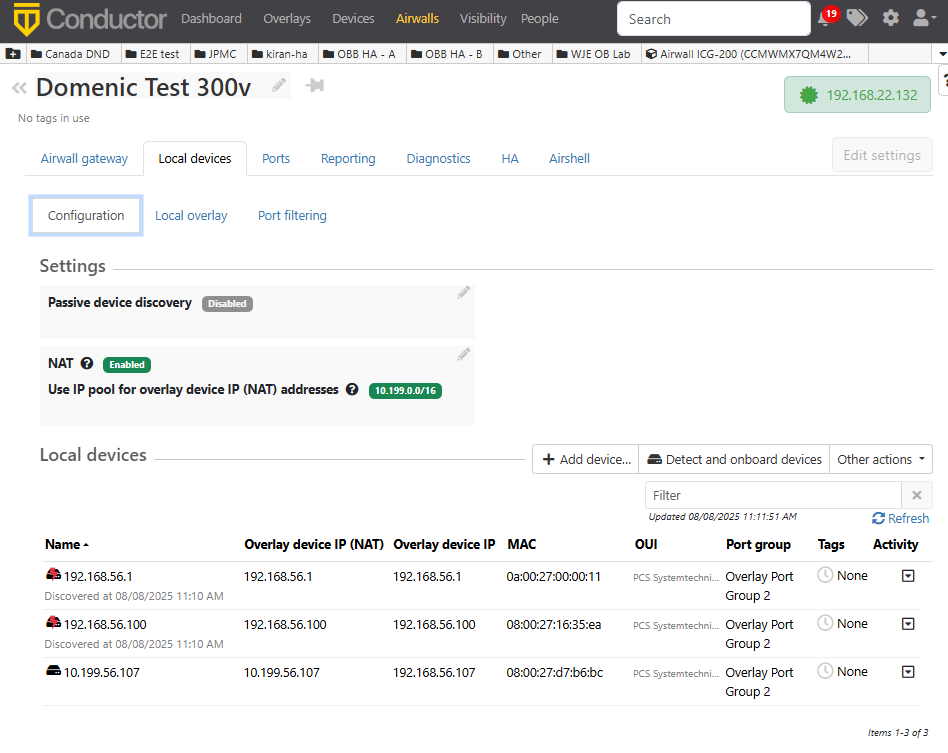
- From the 300v device, discover the second VM and add it as a local device.
- Confirm the newly added local device is on the 300v device.
- In Conductor, add a trust policy between your Airwall agent and the new
device to allow secure communication.

- Verify connectivity by testing communication (ping or HIP) between your Airwall agent and the new device.